Zuar Runner comes with many different plugins that create jobs of all different types. Most of Runner's plugins come with wizards to help you create jobs. However, if you really want control over your Runner jobs, you need to understand the components of a Runner job configuration.
What is an IO job?
IO stands for input output. An IO job in Runner is a job type that takes some source of data as an input, does some 'stuff' to the data via steps, and then outputs the data in some format.
Typically, most of the jobs in Runner will be IO jobs. This is because the IO job type is extremely flexible. It is used for almost every job that pipes data from a source (APIs, databases, and files) and into any data store (file, database, etc).
Simple Example Dataset
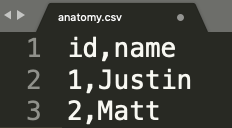
Let's take an extremely simple data set (anatomy.csv) and see all ways we can use this file in a Runner IO job.
CSV to Database Table
Let's start with the most common data staging use case: piping data from a file into a database table.
We will end up with a database table in a PostgreSQL database populated with the data from the file above.
Here's the Runner IO job's JSON config created from the CSV plugin's wizard:
{
    "input": {
        "delimiter": ",",
        "encoding": "UTF-8",
        "includes_header": true,
        "source": "anatomy.csv",
        "use": "xsv.iov2#XsvInput2"
    },
    "output": {
        "dbo": "postgresql://localhost/analytics",
        "schema": "test",
        "tablename": "anatomy",
        "use": "call:runner.iov2.db#todb"
    },
    "steps": [
        {
            "transforms": [
                {
                    "use": "runner.iov2.transform#ExtraColumnsTransform"
                },
                {
                    "use": "runner.iov2.transform#ColumnsTransform"
                }
            ],
            "use": "runner.iov2.steps#Input"
        },
        {
            "use": "runner.iov2.steps#CreateTable"
        },
        {
            "transforms": [
                {
                    "use": "runner.iov2.transform#FlattenTransform"
                }
            ],
            "use": "runner.iov2.steps#Output"
        },
        {
            "use": "runner.iov2.steps#CollectMeta"
        }
    ]
}
Input
The input object in the Runner IO job's JSON config handles the source of the data for this job. In our case, the source of data is a file. The key/value pairs in the input define attributes of the file and which underlying code we are running.
"input": {
    "delimiter": ",",
    "encoding": "UTF-8",
    "includes_header": true,
    "source": "anatomy.csv",
    "use": "xsv.iov2#XsvInput2"
},
Since we are using a file, we need to tell Runner some information about the file:
- delimiter - What character separates the data into columns? In our case, we have a CSV, so we specify a comma
,as the delimiter. - encoding - What is the file encoding? Encoding is a deep topic which you can learn more about here. In our case, the file encoding is
UTF-8. - includes_header - Does the file have a header as the first row? In our case, this is
true. Most files should have a header to denote the column names, however not all files have this. - source - What's the name of the file we want to use? In our case, the file is named
anatomy.csv. The file must exist on Runner's file system. - use - This is the underlying code that Runner uses to read and pipe our data. In our case, we are using code that reads delimited files (XSV).
There are many other potential options we can add to the input, but for now we will stick with the default from the CSV plugin's wizard.
Output
The output object in the Runner IO job's JSON config handles the destination for the data being read from the input. In other words, where should the data end up? The typical use case for an IO job is to output data to a database table, so we will be doing that in our example. For other use cases, data from the input can also be output to files and other data stores.
"output": {
    "dbo": "postgresql://localhost/analytics",
    "schema": "test",
    "tablename": "anatomy",
    "use": "call:runner.iov2.db#todb"
},
In our case we are outputting data to a database, so we need to give Runner information about the database table we want to create:
- dbo - What's the database url? This includes the driver, username, password, server, port, database, and any optional parameters. In our case, we are outputting to Runner's built in PostgreSQL (
postgresql) database server (localhost) and using a database calledanalytics. - schema - What's the database schema we want to create the table in? In our case, we are creating the table in the
testschema. - tablename - What's the database table we want to create and populate? In our case, we are creating and loading data into a table called
anatomy. - use - This is the underlying code that Runner uses output our data. In our case, we are using code that outputs to a database.
Steps
The steps list in the Runner IO job's JSON config handles everything between the input and the output. Steps occur in order based on their position in the steps list.
In our case, we have the standard set of steps, however steps are extremely customizable and powerful. Steps are a deep topic, and we will cover step customization in a future blog post in this series.
"steps": [
    {
        "transforms": [
            {
                "use": "runner.iov2.transform#ExtraColumnsTransform"
            },
            {
                "use": "runner.iov2.transform#ColumnsTransform"
            }
        ],
        "use": "runner.iov2.steps#Input"
    },
    {
        "use": "runner.iov2.steps#CreateTable"
    },
    {
        "transforms": [
            {
                "use": "runner.iov2.transform#FlattenTransform"
            }
        ],
        "use": "runner.iov2.steps#Output"
    },
    {
        "use": "runner.iov2.steps#CollectMeta"
    }
]- Input step - The input step determines what happens to the
inputdata as it is being read by Runner. In our case, we have twotransforms: ExtraColumnsTransform and ColumnsTransform. ExtraColumnsTransform finds all the columns in the input data. ColumnsTransform learns the data type of all columns in the input data. Together these two steps are incredibly powerful and enable Runner to create and adjust database tables with the correct schema without any user intervention. - CreateTable step - This step creates a database table based the learnings from the Input step and from the information provided in the
output. - Output step - This step outputs the data in a format usable by a relational database.
- CollectMeta step - This step outputs some metadata (row counts, etc) into a separate table in the output database.
This is barely scratching the surface of what steps do, but is enough for a general understanding.
End Result
When this Runner IO job is run, the end result is that we now have a table in Runner's PostgreSQL database called test.anatomy. For files, Runner adds one extra __index__ column to show which row of the source file each row in the database corresponds to.
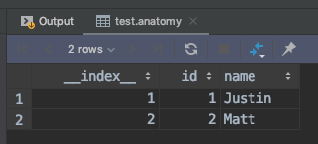
It is very important to note that we did not have to tell the database anything specific about the content of the data in our source file in order to create the database table. Runner reads the data from the input, learns the data during the steps, and outputs the data into the database table without any user intervention or guidance.

Transport, warehouse, transform, model, report & monitor: learn how Runner gets data flowing from hundreds of potential sources into a single destination for analytics.
To close, here are a few helpful Runner-related links:
 Andy Klier
 Greg Rossi